Take a good look at this photo, I need to explain a couple of things.
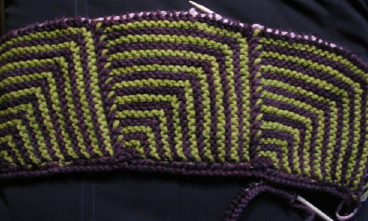
It's a progress photo of the Plan Ahead MD Squares.
To get a photo so it's not all bunched up and can be seen, I had to remove the needle. Across the top you can see a light pink holding thread. At the bottom of the pic you can see some of my needle with a bunch of stitches on it. Notice how nice and smooth the bottom of this strip is compared to the AAYG strip in the previous post. Yeah, that's my kind of edging!! Unfortunately to get this kind of edge you'll need to do a little planning ahead and a some math. It's just a tiny bit of math I promise.
The first thing you need to decide is how big do you want your square. The Simple Single Square pattern is for a square 10 sts x 10 sts we'll use a square that size for now just to be consistent. So let's say you want to make a strip 9 squares long with 10 x 10 squares. You'll need to begin by casting on 109 sts.
Hmmm how did I get that number.....
9 squares 10 sts wide, (90) + 10 sts for the edge of the first square + one center stitch for each square (9) = 109 sts.
Or if math doesn't scare you, use the formula below.
Where:
a = number of squares
b = number of stitches wide
(a x b) + a + b = number of cast on stitches.
Now let begin our PAMDS.
Cast on 109 sts.
(note: I suggest using a knitted on cast as I did for the squares in the photo (or perhaps a long tail cast) this cast on edge will be one short side and the bottom edge of your strip. The bind off will be the other short edge and the top of your squares. Using a knitted cast or the long tail makes the top and bottom look alike.)
Knit back 98 sts, leaving 11 sts unworked.
These ll sts are your center stitch and side edge of your first square.
Begin your square using the SSS pattern Rows 1 -18 with 2 small exceptions.
Omit the "knit 11" of row 1 so it only reads " Row 1: YO,K1, YO,K2tog, turn."
and add a knit 1 to end of Row 18 so it reads " Row 18: Sl 1, Knit 19, K2tog, K2, turn.
From this point on work the SSS pattern Rows 1-18 with the changes in Rows 1 & 18, until you have worked all 9 squares.
EXTRA NOTE: If you are working a two color square, you might also want to consider employing the "Neatness Tip" from the previous post so you won't have the 1/4 inch long floats of the CC on the wrong side.
At the end of the ninth square there will only be one stitch left to knit, knit it, turn. Sl 1, and bind off all stitches.
Your strip is done!!!
Obviously the greatest advantages to using this method for making a strip of squares are once again, the only ends you have are the begin and ending ends and you didn't have to pick up any stitches! Another clear advantage is the nice smooth edge it has.
The disadvantages of this method are that you have to plan ahead, do a little math, and, I don't know about you guys, but I'm not thrilled with casting on a bazillion stitches and having them on my needle waiting to be used.
Using this PAMDS method for a strip of 9 20 x 20 squares (like the ones in the photos above) would be a nice sized scarf (about 60" x 6.75") but to start the dang thing you'd have to cast on 220 sts...um not my cup of tea....so personally I think this is an disadvantage, maybe it's not a problem for you. Being the neurotic and compulsive person I am, I have figured out the ultimate solution that will satisfy my obsession for a neat edge, my desire to just pick-up and start without much forethought, and without the tedium of casting on a bazillion stitches, plus it inherently sets a world of options at the knitter's feet.
Can you guess what the "ultimate" solution is???
Come on you sock knitters.....think about it....
Coming up next...The Joys of the ProvO
Did I just see a flash of brilliant light or do I have another migraine looming? LOL
No comments:
Post a Comment