In the last few posts I showed you how to work a simple square, then two methods that could be used to make a continuous strip of squares (aka a scarf). Within those posts I pointed out the inherent troubles with working squares with either of these two methods, the uneven edges, the tedium of casting on a bazillion stitches, etc. Today's post, IMHO takes all those woes and throws them out the window! (Of course there are troubles with this method too...isn't there always???...but it's a problem that leads to MUCH neater edges, and throws open the doors of possibilities....so I guess it's not so much a problem huh. :-)
The simple solution is the almighty PROVISIONAL CAST ON.
There are several ways to do a provisional cast on, I prefer the method that uses a length of waste yarn and to make your stitches you sort of work a figure 8 around it. The crocheted chain method is a good one, and doesn't look as sloppy as the figure 8 method, but hey...I like to keep things simple as possible....I hate fiddly things and one way to use the crochet chain cast on is, well, a bit like picking up stitches and takes more time, and ya know, sometimes I'm just too dang lazy to get up off my butt and get a crochet hook!! Don't know about you, but when I want to start something I want to start it and not spend a lot of fumbling time in the set-up stage!
Here are a few links to get you familiar with the provisional cast on of your choice.
http://knittinghelp.com/dynamic/php/video/index.php?file=/cast-on/invisible-co-rds.mpg
http://www.thedietdiary.com/blog/lucia/581
http://www.knittingatknoon.com/provisional.html
http://www.eunnyjang.com/knit/2006/03/majoring_in_lace_part_iv.html
Got your choice of a provo* cast picked out??
Here we go, a MD scarf with some really nifty edges!!
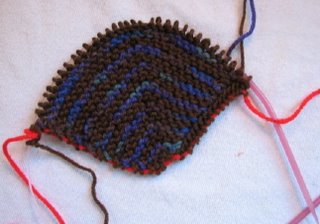
So your first square is done, notice the red waste yarn along the bottom edge and the first short side of the soon to be scarf.

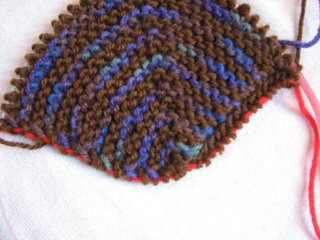
Here is a closer look.

The next step is to pick up that waste yarn and make some more provo casts. The number to cast on at this stage is equal to the number of stitches for one side of your square, plus one. For example if your square is 20 x 20 you'd cast on 21 stitches, if your square was 10 x 10 you'd cast on 11 stitches. In the pix I've used a square a that is 16 x 16 so I cast on 17 stitches.

Next step is to knit back across the new cast on stitches. Knit back across 16, wrap the CC yarn for neatness, then begin the first row of the new square with YO, K1, YO, K2tog, turn.

Just keep adding squares until you have reached your desired length or have run out of yarn!

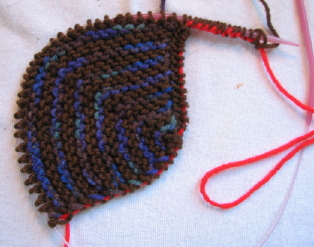
Let's pretend the piece in the above pic is a long and lovely scarf...come on guys...do you have any idea how many scarves I have at this point?!? Notice the red waste yarn goes from one short side all along the bottom edge and there are live stitches all along the top edge and the other short side......Yeah, here it is, the trouble spot with this method...look at all those stitches that need to be bound off!!! Yikes!! But the HUGE benefit is that ALL your edges are going to match, so for me it's not really a problem.
PLUS.........all those live stitches....hmmmm...how about working another row right on top of this one? Or maybe underneath it?? And what about putting a nice border around the whole thing instead of just binding off??? Ohhhhh the possibilities!!!
Monika has completed an Add As You Go scarf.....check out her blog...... http://yarnloopie.blogspot.com/
She's such a sweetie, test knitting some things for me. And can I tell you the woman amazes me!! She does such lovely work AND she does it mind blowing fast too!!!!
Now I think is it's time to go back and revisit something I mentioned in another post....the 4-patch. Yep, I think we got enough of the need to know how-to's done so the 4-patch won't be as difficult to work. The 4-patch will be the next post, again for ease of searching for it at a later date.
*provo = my personal short hand for "provisional cast on"
I've overlooked this entry. Got it now. ;o)
ReplyDelete