Had no inspiration to start anything new, and absolutely no desire to finish anything that has already been started. It's a crummy place to be. So today I decided to do something even it was silly. So I made a another bag.......sigh. The only thing that is held my interest was the the fact that it started out as this:

Yep, even though the pic sucks big time, I'm sure you can tell it's a mans shirt. This dang shirt has been hanging around neglected for ever. If I remember correctly I think one of my sons got it for X-mas from his grandmother when he was in high school....um yeah, he's 28 or 24, take your pick which son it was I don't remember, point is, it should have gone to the GW a looooong time ago! It's one of those really heavy brushed denim shirts that never relaxes and feels like cardboard, thus it'd make a decent grocery bag. :-)
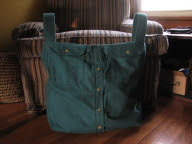
Here's the bag:

Again a lousy pic but that's about how I feel, all blurry, dark, and wrinkled.
Super simple, or at least it would have been super, super simple if I didn't want to leave the breast pockets. Without pockets just cut the top of the shirt off even with the underarm. With pockets that are placed higher than the underarms you have to lay the sleeve open on the inside of the shirt. Cut the sleeve lengthwise down the sleeve crease (opposite the seam) and make a dart in the sleeve at the armpit to compensate for the extra fullness of the sleeve and the dip in the fabric that forms the underarm..
The handles are made out of the remaining sleeves. I rough cut rectangles about 5 x 16 folded the edges to the center, lengthwise, fold them lengthwise again. I made 7 rows of stitching down the length of each.
Folded a hem along the top of the shirt, placed the handles, and layered on a stripe of 1 inch bias tape. Sew the edges of the tape and once down the center for extra firmness around the edge.
Button up the shirt, and run a line of stitching on each side of the button band. You could make another pocket and have it open here at the button band, but I didn't. My grocery bag doesn't need pockets and I already have two! BTW the two breast pockets that I left intact are not usable I sewed them closed under the flaps when I sewed the bias tape.
Sew the bottom of the bag straight across, trim the tails, and square off the corners. Done.
A quick update on the leather coat project.
Aaarrrrrgggghhhhh.........
The baseball cap has been kicking my butt. I made the crown a couple days ago, I was OK with it not thrilled but ok. Worked on the brim yesterday and again today, then finally said the hell with it and sewed the brim to the crown. Yep I sure did, and sewed that sucker on upside down!!! Oh you bet I did. I'm no longer loving the baseball cap, but hate it so much right now, I HAVE to finish it. Does that make sense to anyone out there, or am I all alone on this one??? It will be another couple days until the cap is out of the time-out corner, in the mean time, maybe I'll get some mojo going. We can only hope, if the best I can do today is turn a shirt into a bag its time to give up. Sheesh!
Don't be so hard on yourself! But I've got to say, your pics suck! So dark, can't see a thing, and the bag looks so promising, real neat! Maybe you need a break from all that crafty stuff. There was still something left from the coat to make a baseball cap? What size was that coat anyway??? ;o)
ReplyDeleteI absolutely know what you mean about the cap. I was wrestling with a grocery bag made out of a t shirt, once I leaned my lessons from that one, I got my sewing mojo back. I love the denim bag!
ReplyDelete