Space and more storage was my goal today. I have GOT to get a wee bit more organized. I promised myself that today there would be no needles or fiber of any kind in my hands, except for the purpose of putting it away. I thought this was a fairly doable promise.......Um yeah, about that......
I started out pretty good, cleaning the main floor, then I made the fatal mistake of going upstairs.
Ooops. Looking around my main workroom, the huge
gaping hole where a cabinet use to be, (its now in the kitchen, a casualty of the last furniture shuffle.) was screaming at me. It was undeniable, I needed more storage, a lot of what was in the cabinet is just sitting on the floor.....sigh. But where and what kind of storage was a problem. I don't have that many cabinets or bookcases. OK, that's a lie, yes I do, but they are all in use at the moment. So my brain got going with the, 'if I put this here' and 'that over there' and 'use this to do that' kind of thinking. I decided the solution to
today's problem would be a few storage cubes. Now with a solution figured out, the next problem was that I didn't have any storage cubes. Oh well, not
really a problem, I'll make some!
From going to school and teaching school I've ended up with TONS of 3-ring binders. Over the years I've been clearing them out, getting rid of the contents, or properly filing it away, and eventually getting rid of most of the binders. I've hung on to a few but today decided that a couple drawers full (that's "a few" right?) of empty 3-ring binders was a total waste of space, and yet I had this nagging voice in my brain that said I could use them for something. (Is it just me or does everyone hear voices?)
(5) 3-ring binders equals 2 storage cubes, aka binder boxes, and one nearly empty drawer!:


How to make them:
With scissors cut a notch out of the spine up to and as wide as the rivet. The notch I cut in this pic is a too narrow. Cut the notch the same width as the rivet.
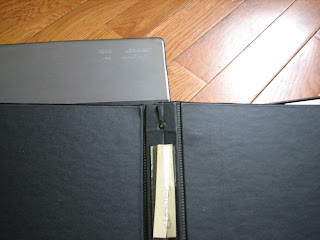
Pull out the notch. A pair of needle nose pliers really helps.

Pry up the 3-ring part to disengage rivet. I used my scissors, but a screwdriver would probably work better, or one of those nifty mini pry bars. I was just too lazy to get up and get the proper tool. Be careful how you pry this 3-ring part up, you don't want to damage either front or the back. Notice the tip of my pry-bar-scissors are on the spine of the binder under the 3-ring part.

When the rivet comes loose, cut up the center of the spine as close to the other rivet as possible.

Grab the 3-ring part and pull it out.

Cut the spine remnants off. Make your cut close to the spine edge of the fused hinge.
Then again, you could skip all the above steps and just cut the spine away with out removing the 3-ring metal part. :-) Note the cutting line is on the spine side of the fused hinge. Doing it this way leaves the vinyl covering over the cardboard intact....no "raw" edges.

Repeat the above steps for all binders. Stack all the individual pieces and tape them together in a bundle. Make sure they are all facing the same way. (I considered turning one so one of the inner clear pockets would face outward when I put the cube together, but decided not to in the end, my storage cube doesn't need a label)) I used masking tape, one strip around all four sides held them well enough. Measure and mark where you want your lacing holes to be. (I measured one horizontal side and one vertical side and then marked the remaining sides with corresponding dots) All holes are
approximately 1/2 " from the edge and 1 inch apart. (personally I just eyeballed it, I mean really, it's just a box made out of 3-ring binder pieces and lashed together with string!) I used a drill with a 7/64 bit to drill the holes. (I'm pretty sure it was 7/64
ths, it was in the 7/64
ths slot in the bit box, but who knows for sure if was put in the right slot!) Sorry no drill photo but drilling with one hand and taking a pic with the other doesn't work very well.

Lace three of them together, using a cross stitch.......yeah I know, a needle and fiber...promise broken.......I used plain old kitchen cotton. Nylon cord, yarn, ribbon, just about anything would work. The cotton did fuzz a little bit with all that lacing. I used the cotton doubled.
To determine how long a length of string I needed, I roughly measured out 5 times the length to be laced, and then doubled it. (4 times the length will probably be long enough, but I'd rather have longer ends to tie off and then snip them, than fighting with short ends inside the box.)
If you don't hold the pieces at right angles and just stitch them like this, make sure you make your stitches loose enough so the pieces will open to a 90 degree angle. (oops, I learned this the hard way) The
easiest way to hold the pieces at a right angle to stitch them was stand an undefiled binder upright right and rest one cut piece on top of it holding the other perpendicular to it for stitching.


The fourth piece is oriented differently. You laced the first three together spine edge to spine edge, or long side to long side. This fourth (and the fifth) piece will be laced to the short sides of the first three pieces using two long sides and one short side of the fourth piece. You will end up with about 1.5 inches that can't be lace because there are no corresponding holes. See the right edge below. No problem, just begin lacing in the second hole of that piece. The lip that is formed will give you a nice slot for your fingers if you put this cube on a shelf.

Lace the fifth piece just like the fourth and Ta
Da! You have a binder box. See the two lips formed by the fourth and fifth pieces...not a problem.

Notes and other thoughts regarding the binder boxes:
- A simple whip stitch once across each edge would prob'ly hold these just as well as the cross stitching.
- I bet several other stitches would work as well also.
- No reason why you couldn't stitch a nifty string art motif on one of the sides.
- Obviously the stitching along the top edges of these boxes has no purpose other than decorative cuz the holes were already there.
- I suppose, when drilling the holes, you could think about it some more and not drill those holes, but I didn't want to think that hard!
- You could also lace the first three together on their short sides and have a shorter, more cube like box, but then the lip would be about 4 inches high.
- Kittens aren't a very helpful.


Now what should I do with these???????


